Help Center

How to Design Your Custom Wall Bookcase

A complete guide to creating, customising, and ordering your bespoke wall bookcase on Woodcoder.

Open the Designer →
1 Getting Started

Navigate to the Wall Bookcase Designer

Follow these steps to open the 3D wall bookcase configurator on Woodcoder.

🌐

Open Woodcoder

Go to www.woodcoder.com in your browser. Click Categories in the top navigation or Start designing on the home page.

🛋️

Select Living Room

On the Design by Room page, click Living room from the left sidebar. It is selected by default when you open the page.

Wall Bookcase

Choose Wall Bookcase

Scroll down the product grid until you see Wall Bookcase. Click the card to open the 3D configurator immediately.

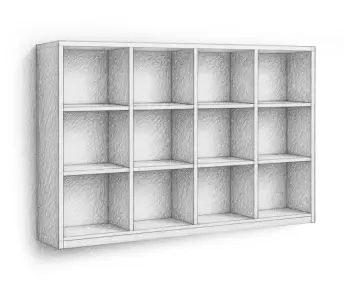
Bookcase types available in Living Room: Bookcase · Wall Bookcase · Floating Bookcase · Corner Bookcase · Decorative Corner Bookcase. This guide covers the Wall Bookcase — a bookcase that attaches directly to your room wall.

🧱 Wall Installation

Important: This Product Attaches to the Wall

The Wall Bookcase is designed to be fixed directly to the wall of your room. This is different from a standard floor-standing bookcase and requires wall mounting before use.

⚠ READ BEFORE ORDERING

The wall bookcase must be securely fastened to the wall by the installer. The wall must be capable of supporting the weight of the bookcase, its contents, and the mounting hardware. Woodcoder is not responsible for damage caused by incorrect or insufficient wall mounting.

🔩

Wall Mounting

The bookcase is supplied with a wall-mounting rail or bracket system. The installer must anchor this securely into the wall studs or use appropriate wall anchors for the wall type (concrete, drywall, brick, etc.).

  • ✓ Suitable for most wall types
  • ✓ Mounting hardware included
  • ⚠ Use correct anchors for your wall type
👷

Professional Installation Recommended

Wall mounting requires drilling into your wall and working at height. If you are not experienced with wall mounting, Woodcoder's optional paid installation service is strongly recommended.

  • ✓ Optional paid installation from Woodcoder
  • ✓ Or hire a local technician
  • ⚠ Do not attempt if unsure about your wall structure
📐

Plan Your Height

Decide the mounting height before installation. Consider the height of the people who will use it, what will be stored inside, and the overall visual balance of the room.

  • ✓ Mark the wall position before drilling
  • ✓ Use a spirit level to ensure it is straight
  • ✓ Check for pipes and cables before drilling
2 The Designer

Understanding the 3D Configurator

When the designer loads you will see a live 3D preview of your wall bookcase. A 180 cm human figure stands beside it for scale. All customisation is done through the toolbar at the bottom.

1

⚙️ Dimensions

Set the overall size of your wall bookcase. Adjust each dimension using the slider or the and + buttons. Price updates instantly in the top-right corner as you change values.

Height (default 192 cm) Width (default 180 cm) Depth (default 35 cm)
2

▦ Compartments

Control the internal layout — number of columns and rows, and the width/height of each compartment.

Column count Column Height Row No Inner Column Width Inner Compartment Height
3

🚪 Box Type (Doors & Drawers)

Click any compartment in the 3D view to select it (it highlights orange), then choose its type. See the Doors & Drawers section for all available options and size limits.

Empty (open shelf) Door Drawer
Handles Handle Position Handle Size
4

🧱 Wall

Extend the wall panels of the bookcase on any side. This adds a solid panel to the selected edge, allowing the bookcase to integrate cleanly into its surroundings or create a built-in look.

Left Right Top Bottom
5

🎨 Material & Colour

Choose board material and colour. Use the parts selector to apply different colours to different parts. See the Materials section for guidance on choosing wisely.

All parts Body Back panel Doors Drawers Edge tape
6

✨ Accessories

Click a compartment to select it, then toggle accessories on or off for that specific compartment.

Dress Hanger Lights Locks Vertical Divider Door Mirror
💡 OTHER CONTROLS

Undo / Redo — left side of the 3D view.  |  2D/3D toggle — bottom-right corner.  |  Save (floppy-disk icon, top-right) — requires a free account; Google login works.  |  Share (network icon, top-left) — name your design and share the link.

💰 Pricing

How Your Price is Calculated

The price of your product is calculated online and displayed instantly in the top-right corner of the configurator.

What affects the price?

  • Overall dimensions (height × width × depth)
  • Total material consumption
  • Manufacturing complexity
  • Hardware and fittings used
  • Type and quantity of components
  • Number of painted components
  • Use of natural wood surfaces
  • Premium hardwoods (especially walnut)
  • Combinations of different materials

What increases cost most?

  • Painted MDF components (curved shapes)
  • Premium hardwoods like walnut throughout
  • Many different materials in one piece
  • Large dimensions requiring more board
  • Many doors, drawers, and accessories
💡 DESIGN SMART — GET MORE FOR LESS

Using premium materials everywhere does not always create the most beautiful result. A thoughtful designer uses standard MDF for the structure and body panels, then uses walnut or premium materials only for doors and visible surfaces. This creates a luxurious focal point while keeping the overall cost under control.

Think of it like jewellery. A ring made entirely of diamonds is extremely expensive and each stone loses visual importance. The most beautiful jewellery combines valuable materials strategically — a gold setting with one precious stone as a clear focal point. The same principle applies to furniture. Use premium natural wood on tops of sideboards, tabletops, kitchen countertops, dresser tops, and other key decorative surfaces — not everywhere.

🪵 Materials

Understanding Your Material Options

Woodcoder uses premium-grade materials exclusively. Understanding the difference between material types helps you make better design decisions.

🎨

Decorative MDF Panels

Premium melamine-faced MDF with advanced surface finishes, textures and colour effects that create a highly modern and sophisticated appearance.

Max sheet size: 1200 × 2800 mm

  • ✓ Best for: Doors
  • ✓ Best for: Drawer fronts
  • ✓ Best for: Decorative / feature panels
  • ⚠ Large structural parts may exceed sheet size
🖌️

Painted MDF

Allows curved shapes, rounded forms and custom components that cannot be edge-banded with conventional PVC edging. Many designs can only be produced using painted components.

Max sheet size: 1800 × 3600 mm

  • ✓ Water-based, non-toxic
  • ✓ Child-safe
  • ✓ Environmentally responsible
  • ✓ European market compliant
🌳

Natural Hardwood

Selected for clean appearance and minimal defects. Creates warmth and luxury — but use strategically for best results and value.

Max sheet size: 1900 × 3500 mm

Best places to use natural wood:

  • ✓ Tops of sideboards and buffets
  • ✓ Tabletops
  • ✓ Kitchen countertops
  • ✓ Tops of dressers
  • ✓ Key decorative surfaces
🪟

Laminated MDF Panels

MDF panels with a high-quality laminate surface, combining the stability of MDF with a durable decorative finish.

Max sheet size: 1800 × 3600 mm

  • ✓ Durable surface finish
  • ✓ Good dimensional stability
  • ✓ Suitable for large panels
  • ✓ Wide range of colours and textures

Material Quality Standards

All Woodcoder materials are premium-grade. Premium MDF boards are denser, heavier and stronger than lower-grade alternatives.

  • ✓ Superior durability
  • ✓ Improved screw-holding strength
  • ✓ Greater dimensional stability
  • ✓ Longer service life
🚪 Doors & Drawers

Adding Doors and Drawers

Click a compartment in the 3D view to select it (it highlights orange), then choose a type from the Box Type panel. Selection works differently for doors and drawers:

  • 🚪 Doors — Range selection
    Click a compartment to select it. Click another compartment in the same column to extend the selection — the orange border stretches to cover all compartments between your first and second click. Click any selected compartment again to collapse the selection back to just that one. This way you can assign a door to multiple compartments in one step.
  • 📦 Drawers — One at a time
    Drawers must be assigned to each compartment individually. Click one compartment and assign a drawer, then repeat for the next compartment.

Why is an option greyed out / disabled? Each door and drawer type has minimum and maximum size requirements. If your compartment dimensions fall outside these limits, that option is automatically disabled and a message is shown explaining why. Adjust your compartment size in the Compartments panel to enable it.

📐 Size Limits

Door & Drawer Size Limitations

All dimensions are in millimetres (mm). A door or drawer option is only available when your compartment dimensions are within the Min–Max range shown below.

Door / Drawer Type Min Width Max Width Min Height Max Height
Pull-out shelf 3001200100120
Framed glass double 20012001503600
Framed glass down 2001200300720
Framed glass up 2001200300720
Framed glass right 1007201503600
Framed glass left 1007201503600
Glass right door 1007201503600
Glass left door 1007201503600
Glass double door 20012001503600
Flap up door 2001200300720
Flap down door 2001200300720
Double door 20020001503600
Right door 10010001503600
Left door 10010001503600
Drawer 3001200121720
💡 HOW TO FIX A DISABLED OPTION

If a door or drawer type is greyed out, go back to the Compartments panel (toolbar icon 3) and adjust the compartment width or height until it falls within the range shown above. The option will become available automatically.

📦 Delivery & Assembly

Delivery, Assembly & Fasteners

📦

Flat-Pack Delivery

Your furniture is delivered as a professionally manufactured flat-pack package complete with assembly instructions — as though thousands of identical units had already been produced. Worldwide shipping available.

✓ Free shipping is currently available. Shipping policy may change — please check the website at checkout for the latest information.

🔧

Assembly Tools

Most connections use a ball-end Allen key or a 4 mm ball-end hex bit fitted in a cordless screwdriver. A cordless screwdriver is required for screw fastening — hand tools alone are not sufficient.

Purchasing the Woodcoder tool kit with your first order is recommended. It includes the correct bit and everything needed for assembly.

👷

Assembly Difficulty

Assembly is simplified but still requires care and basic technical skills.

  • ✓ Two people recommended for larger pieces
  • ✓ Optional paid installation available from Woodcoder
  • ⚠ If no previous furniture assembly experience, hiring a local technician is strongly recommended
  • ⚠ An incorrectly installed connector can damage the fitting
🪛

QR Code & Assembly Guide

Every panel has identification information and a QR code printed directly on it. Scanning the QR code shows you the final product and the exact position of that panel in the assembly.

A printed assembly guide is also included with every order.

Drawer assembly note: Drawer installation is more complex than other components and is best performed by an experienced furniture installer. Woodcoder drawers are built from 18 mm MDF (including the bottom panel) — significantly heavier and stronger than conventional 3 mm fiberboard alternatives.

🎨 Design Freedom

Create Furniture That Has Never Existed Before

Woodcoder allows you to create products with completely non-standard dimensions, designed entirely according to your specific requirements.

  • Any height, width and depth you need
  • Non-standard column and row configurations
  • Mix of open shelves, doors and drawers in one piece
  • Custom material combinations per section
  • Accessories per individual compartment
💡 VERY LARGE DESIGNS

Extremely large pieces may need to be positioned against a wall or attached to another structure for additional stability. Woodcoder does not restrict your creativity — you may already have a structural solution in mind.

🛡️ After-Sales

100-Year Product Support Vision

Woodcoder products are designed with a long-term lifecycle in mind. Our goal is to preserve product designs, manufacturing records, and replacement part capabilities for up to 100 years from the original purchase date whenever commercially and technically feasible.

Replacement Parts

If a panel or component is damaged in the future, customers may be able to order individual replacement parts rather than replacing the entire product. Replacement components are manufactured using the original design data whenever materials, manufacturing technologies, suppliers, and production capabilities remain available.

Every panel has a QR code printed directly on it. Scanning it instantly shows the final product and the exact position of that panel — making reordering a single replacement part simple and accurate.

Our Commitment

This 100-year support vision reflects our commitment to sustainability, repairability, and long-term product ownership.

⚠ PLEASE NOTE

The availability of replacement parts, support services, product records, digital assets, and manufacturing data remains subject to the continued operation of Woodcoder and the ongoing availability of materials, technologies, suppliers, and production resources.

Reinforced Fastener Technology

  • Every screw hole reinforced with a plastic anchor
  • Anchors secured with specialised adhesive before installation
  • Screws can be removed and reinstalled multiple times
  • Significantly reduces joints loosening over time
  • Hinge mounting systems upgraded with larger Euro screws
  • Doors remain stable and free from loosening for years
📞 Contact

Need More Help?

Our support team is available via live chat on the website and responds quickly.

💬

Live Chat

Open on woodcoder.com
📱

WhatsApp

+90 505 331 8189